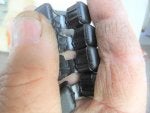
Benelli Forum banner
21 - 33 of 33 Posts
Interesting thread. Something I hadn't considered when I took my alternator off 18 months ago after buying my bike, which I havent managed to run in yet ! ( only 440 miles so far )

As my Alternator drive 'rubbers' are now coming up for 14 years old presumably they should be changed in any case as the shelf life has been far exceeded.

So, can anyone say what the original Benelli items are made of for sure ? plastic or rubber ?

Thinking of ordering some Kawasaki ones to fit at service time despite the fact mine ' looked all right ' when I took them out.
 
"If it ain't broke don't fix it"? Possible causes & Loctite

I like the principle "if it ain't broke don't fix it". On the other hand my car still runs fine when the fuel light comes on but I learnt the hard way to take the simple step of refilling before the situation becomes more complicated.

Assuming the history of your alternator drive is unknown I would examine it carefully. If everything is tight and the "rubbers" show no wear I would leave them alone to avoid the risk of introducing a problem. On the other hand if there is the slightest slack anywhere I would fix it to avoid the inevitable trouble. Case in point: on my bike the evidence indicates the drive half coupling had come loose and flogged back and forth. As the slack grew it hammered the driven (alternator) half coupling with increasing severity until that also came loose. While the play in the coupling on the alternator shaft is only slight, I face the likelihood that the new coupling will be a loose fit on the alternator shaft due to wear. This consequential damage could have been avoided if the loose Z25 half coupling was addressed early. (To minimise the financial pain I procured a used Triumph alternator in the hope I can use the armature in the Benelli if necessary.)

One of the steps in Root Cause Analysis is to identify possible causes. Benelli alternator drive failure apparently occurs on some bikes but not others. Possible causes I can identify are: Variation in component fits due to machining tolerances, variation in material used for the "rubbers", variation in assembly practices including bolt tension and retaining compound application, variations in operating conditions (eg. rev range, temperature). Any additions anyone?

Another small development: Since Australia does not have the "High Temperature Sealer" specified in the service manual for application to the splines I referred the problem to Loctite technical support. I was advised to use Loctite 620 without primer and leave it to cure for three days before starting the engine, to ensure it develops full strength. Information was provided showing the use of Loctite Primer gives a faster cure but with lower strength. Hence I will use brake cleaner to degrease the parts and dry them completely before assembly.
I respect your viewpoint Rolf, as you seem to have a lot of knowledge based on engineering experience, and I am happy to leave my alternator alone for the time being, but will have a good look at everything again when I have got as far as a 3000 mile service, or if any unusual noises begin ! I usually prefer the maxim ' prevention is better than cure ' but have also been known to follow ' if it ain't broke don't fix it ', sometimes though I have reached the one which starts ' Oh bugger, I should have done........... '
 
Change to Kawasaki rubbers?

I am happy to leave my alternator alone for the time being, but will have a good look at everything again when I have got as far as a 3000 mile service, or if any unusual noises begin ! I usually prefer the maxim ' prevention is better than cure ' but have also been known to follow ' if it ain't broke don't fix it ', sometimes though I have reached the one which starts ' Oh bugger, I should have done........... '
Apologies Graham, my previous reply was not concise.
It would be premature for everyone to rush-out and change coupling rubbers just yet.
It might be worth a try for any owner who can't keep their alternator couplings tight or finds their rubbers have failed prematurely.
Objective assessment or accumulated experience are required before we are qualified to make any recommendation.
All I have so far is a hypothesis based on the subjective assessment of components from my bike, a tiny bit of materials science, experience with both plastic and rubber isolators in other applications and Kevin's short but promising experience with Kawasaki rubbers in his Benelli.
The designer would have a reason for his choices. Anyone who makes a change takes a risk and should monitor it closely, as Kevin is doing.
 
New parts arrived - Kwakka rubbers fit perfectly!

My Benelli parts and Kawasaki alternator drive rubbers have arrived.

The Kawasaki rubbers (Part No. 920751790) look and smell like rubber, not plastic, and they are a good tight fit in the coupling. Each segment is compressed about 1mm when the coupling halves are pressed together. The only risk I foresee running these rubbers in the Benelli is that they may become loose in the coupling with use. If and when that happens I will replace them to avoid trouble. Backlash, oscillation and impact would result in accelerated deterioration and could loosen the coupling halves on their shafts once again.

If or when the rubbers will become loose in the coupling is the big mystery. Surely they cannot be worse than the original "rubbers" that were loose and very visibly worn after about 3 years and 18,000 km. As I ranted earlier; I am very optimistic that the Kawasaki rubbers will run happily for years.

Maniac motors supplied a Class 10.9 bolt. That has the advantage it can provide more tension than the original Class 8.8. However I will probably use my modified Class 10.9 bolt that has 12mm of unthreaded shank under the head. As stated in an earlier post, the intention is to allow the unthreaded section to elongate so it can help maintain tension. History may eventually reveal that the modification is either a good or bad idea!

On the new Z25 shaft both the gear and coupling are a clearance fit, hence the need for retaining compound. I am disappointed that this is necessary. I have more faith in mechanical interference than magic potions to prevent movement and fretting in any drive subject to torque reversals.

The Z25 shaft & gear have no match marks and the shaft has one oil hole. I understand from another thread the match marks were discontinued.

And yes Kevin, the clutch cover gasket is the reusable aluminium and rubber flavour, so the financial pain has eased!
 
Kwakka rubbers in - inspection method requiring enlightenment & sensitivity

I fitted the new drive half coupling and Kawasaki rubbers today. To give the retaining compound time to cure I will not start the engine till the end of the week, for participation in the Friday run with the local gang of motorcycling retirees.

The Kawasaki 920751790 rubbers in the new coupling:


I reused the old Z25 shaft because the backlash of the new coupling on the new shaft was not much different to the old shaft. Likewise I reused the old male half coupling on the alternator. Hopefully, with new, gentle rubbers, the bolt tension and retaining compound will prevent coupling movement on the splines.
Trying to avoid going back to this thing ever again, I broke the rule that says "change only one variable at a time" by using a modified Class 10.9 bolt to hold the coupling on the Z25 shaft:

Applied torque was 60Nm on threads that were cleaned and unlubricated, except for the retaining compound. The bolt was snugged then the new cone washer was centred by prising with a screw driver, before full torque was applied. Some 40mm square tube slotted at one end was used to restrain the coupling while the bolt was tensioned. It was also used to hold the alternator shaft while 45Nm was applied to the nut.


The coupling rubbers were lubricated with a smear of lithium grease before aligning the coupling blades with the gaps between the rubbers and pressing the alternator home by hand (it went-in fairly easily after a bit of wriggling and messing about).

Through all this I pondered Grahams issue from Post 21. I realise my use of the term "if it aint broke don't fix it" will be misinterpreted. To clarify, I don't advocate waiting for catastrophic failure but I also I prefer to the avoid the strategies of disassembly for inspection and replacing parts that are still servicable. Faults can be introduced this way. A better strategy is non-invasive Condition Monitoring; resorting to invasive intervention only when required.

How do you monitor the condition of a Benelli alternator coupling? I encountered two issues:
1/. Coupling rubber backlash can only be found with the coupling assembled. Graham said his rubbers "looked all right" but I initially thought mine looked pretty good too. It was only after removing the coupling halves from their shafts and assembling them with the old rubbers that I found the rubbers were loose in the coupling. They were worn on the circumference. That increased the gap between segments, allowing backlash.
2/. The bolt can be tight while the coupling is loose. The Benelli service schedule says the coupling bolt should be checked at every service. That check is flawed. My bolt was tight when I checked it but I found looseness and backlash in the half coupling behind the bolt.
It seems therefore, the best way to assess the condition of the alternator drive is to check for backlash while it is fully assembled.

This is a suggestion that may suit gentlefolk with the capability to undertake a delicate check that could damage their alternator if they get it wrong. If you believe you have the necessary enlightenment and sensitivity; read on:
Through the ribs of the alternator casing, near the slip ring end, there is a pressed metal fan. This fan can be used to check for drive coupling backlash. It requires very carefully inserting a small screwdriver from below and behind to gently press a fan blade in one direction, then the other.

This way I confirmed that my alternator drive now has no backlash. The only movement is a slight deflection allowed by the flexibility of the new rubbers.
If any backlash is detected the rubbers should be replaced as soon as possible, to avoid oscillation, impact forces and loosening of the coupling halves on their splines.
The method is only for those who can distinguish the fan blades, which are difficult to spot, from the windings and other alternator innards. Best disconnect the battery during this check, to avoid possible calamity.

On Friday I hope to find-out whether or not my alternator drive is still tight after perhaps a 300km run, cruising at around 3500-4000 rpm. I also hope my hand is no longer numbed by an awful vibration in the right handle bar.
 
Coupling still tight with Kawasaki rubbers, after 340km.

Nellie took me for a 340km run today, after Wednesday's exercise fitting a new female half coupling to Z25, refitting the male half coupling to the alternator and installing Kawasaki rubbers. I had been advised to leave the retaining compound to cure for 72 hours before starting the engine. My patience lasted only 36 hours. Never the less, the clatter from the alternator is gone. The vibration of the right handlebar was greatly diminished and no-longer numbed my hand. Slight vibration was still detectable at 3500rpm by gripping the handlebar tightly. It was just enough to tell me the bike was alive and was no-longer a problem. After the bike cooled-down I checked the alternator backlash with the risky, screwdriver in the fan method, described in the previous post. There was no discernible backlash. The Kawasaki rubber installation appears to be success. Time and operation will tell whether or not the remedy lasts but it is looking very promising.

A warning if you attempt the screw driver in the fan check - use a torch so you have enough light to see inside the alternator. Rock the rear wheel while the bike is in gear, to make the fan blades move so you can identify them. Please do not poke the wrong bit or use force, as it might damage your alternator.
 
Not so great news. I checked the Kawasaki rubbers I used and have found damage similar to that on the Benelli ones after 3,000 miles. There is no vibration and the rubbers are still a good snug fit, but it looks like I'll have to change them again after another 3,000 miles.

 
Not so great news. I checked the Kawasaki rubbers I used and have found damage similar to that on the Benelli ones after 3,000 miles. There is no vibration and the rubbers are still a good snug fit, but it looks like I'll have to change them again after another 3,000 miles.

View attachment 23977
:( Darn! But thanks for the info Kevin. Mine still has no backlash after 4000km but I had best remove the alternator after tomorrow's run to check for damage to the rubbers.
 
Kawasaki Rubbers failing

Eventually checked the Kawasaki rubbers after 5,000 km. They are still doing the job, the coupling halves are still tight and there is no backlash in the coupling but the rubbers are tearing, like Kevin's, where the edge of the coupling blades bears on them. It looks like the rubbers have been trying to extrude through the gap between the coupling halves. The tearing is only on the drive faces, which I take to show they can't handle the force of firing impulses working against the alternator rotating inertia and drive torque. I guess it's back to Maniac Motors for their elements and replacement at every service. The only thing I can see that might make a difference is to take a bit off the faces of the alternator so that the coupling halves engage deeper, leaving less gap for the rubbers to squeeze through.....but I am reluctant to risk messing-up a good alternator.
 

Attachments

Sharp corners and gaps.

I removed the sharp edges before initial assembly Mike. Perhaps it would help to add a spacer behind the drive half coupling to reduce the gap between vane tips and face of the driven half coupling. First step might be get an accurate measurement of the existing gap with the aid of plasticine. The damage on the rubbers in my bike suggests the gap is over 2mm. Maybe 0.5 millimetre would be more appropriate. My bike would have more gap than original due to wear after running for an unknown time with both coupling halves loose on the splines.
 
I have replaced the Kawasaki rubbers with Benelli parts in the alternator coupling on my TRE K 1130. My suggestion in an earlier post that the Benelli rubbers might be plastic appears to be incorrect. They appear to be some sort of synthetic rubber, although they lack the rubbery smell of the Kawasaki rubbers. Examination of the used coupling rubbers shows they compress and harden in service and polish with wear. After use the Kawasaki rubbers look like plastic in the same way the used Benelli items did. The Benelli rubbers are bigger than the Kawasaki items so there will be less space inside the coupling to accommodate deflection, which I presume results in the coupling having more torsional stiffness and hopefully slower breakdown of the rubbers. However it also means it will not absorb the torque spikes as well and will put higher loads on the other rotating parts of the alternator drive. My coupling has stayed tight for 6000 km since I refitted it with retaining compound, a modified bolt, Maniac Motors heavier cone washer and the Kawasaki rubbers. I hope it will continue to do so with the Benelli rubbers. This evening with the new alternator rubbers and a new clutch housing the bike ran quieter than I have ever heard it. The mechanical cacophony that had become so familiar seems to have diminished dramatically. If it starts to clatter again in the future I will have to assume something is awry.
 
21 - 33 of 33 Posts